Auto Clicker for Windows

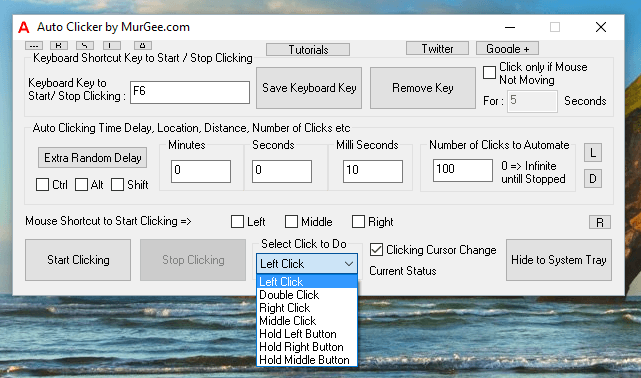
Now you can Download Auto Clicker for Free and try it on your Windows Computer. The Auto Clicker works on Windows 11, Windows 10, Windows 8.1, Windows 8, and other Windows Operating System. The Application is bundled in a setup as it has lots of separate Application programs which work together providing you the best Mouse Clicking Application.
Auto Clicker

Auto Clicker

You can run this Mouse Automation Tool as signed on user or as Administrator. Lots of Games and other Applications like Android Emulator run with Admin Privileges, in order to send automated Mouse Clicks with Auto Clicker to applications running as Admin, you must run the Auto Clicker as Administrator. You can either read more about the software or just download the Auto Clicker and give it a try on your Windows Laptop or Desktop Computer.
Auto Clicker for MMORPG Games

Auto Clicker for MMORPG Games

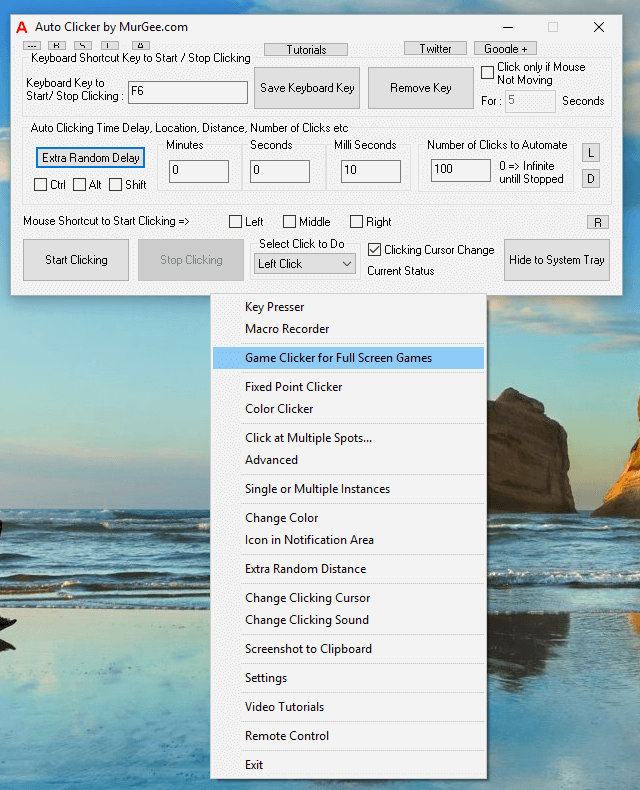
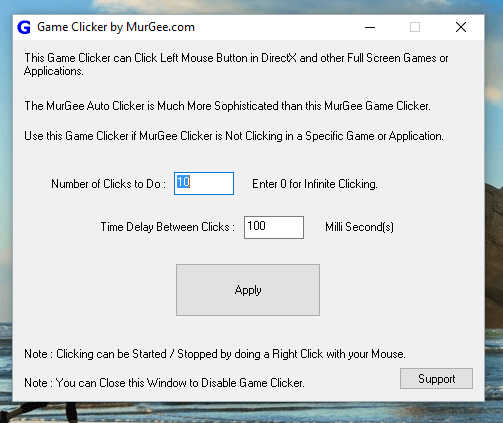
When Playing Multiplayer Games with Auto Clicker, you might need the Game Clicker for Full Screen Games. This Game Clicker simulates Mouse Clicks at deepest level and requires additional components to be installed. Yes there are tutorials available for all the features and are easy to follow and understand. The Game Clicker as displayed in the screenshot below allows you to use Right Mouse Click as Shortcut to Start the Automated Mouse Clicking. Yes you can Right Click again to stop Automated Mouse Clicking.
Game Clicker for Multiplayer Full Screen Games

Game Clicker for Multiplayer Full Screen Games

Yes you can use this Game Clicker in Online Games as well, however the configuration options are minimal as compared to the main application. In the configuration screen, you can configure the number of Left Mouse Clicks to be done whenever Right Mouse Click is done with physical Mouse. The Speed of Mouse Clicking is configurable by configuring Time Delay between Clicks allowing you to Click Faster or Slower as per your requirements.

Automated Mouse Click Explained

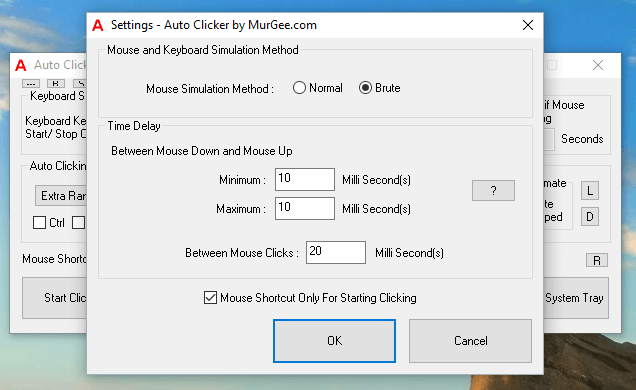
The Automated Mouse Clicks done by this Software are fully configurable. Apart from Number of Mouse Clicks to be done, Speed of Automated Mouse Clicking, you can even configure the time between Mouse Down and Mouse Up. Whenever a Mouse Click is done by hand, the Mouse button is pressed and then released. The Mouse Click is sent by Windows Operating System to the Application Window which is under the Current Mouse Cursor Location.
Configurable Time Delay between Mouse Down and Mouse Up making a single Mouse Click

Configurable Time Delay between Mouse Down and Mouse Up making a single Mouse Click

As displayed in the Screenshot above, you can configure the Time delay between Mouse Down and Mouse Up. Note that the time delay is configurable in terms of milli seconds and there are 2 fields named Minimum Time Delay and Maximum Time Delay. The Actual Time Delay simulated between Mouse Down and Mouse Up is taken as a Random Time Delay between Minimum and Maximum Time Delay so as to emulate Human Click behavior. Whenever you Click by hand, the effective time delay between Mouse Down and Mouse Up will be a random time delay and this Software Application allows you to emulate Mouse Clicking with hand.

Download Auto Clicker

Download Auto Clicker

Yes there is lots more in this nifty utility making it a powerful Mouse Clicker. There are still lots of features which you can use during GamePlay or to just Automate Mouse Clicking for repetitive tasks. Remember that you can download this Application right now on your Windows PC and start using it. In case you would like to read more, just keep on reading and explore other features of this software. The Screenshots of this software have been captured on a Windows 10 Computer and on other Windows Operating Systems, the Application adapts to your current Windows Theme. Whether you are using 32 bit Windows Operating System or a 64 bit Operating System, this Auto Clicker works well and is used by lots of Gamers around the world to Automate Mouse Clicking.

Screen Location of Automated Mouse Clicking

One of the unique features of this Mouse Automation Utility is that you can define the location on screen which receives the Automated Mouse Clicking. You can either configure the Software to send Mouse Clicks to a Fixed Screen Location or Click at Current Mouse Cursor Location. The Screen Location button allows you to configure the Screen Location which receives Automated Clicks as displayed in the screenshot below.
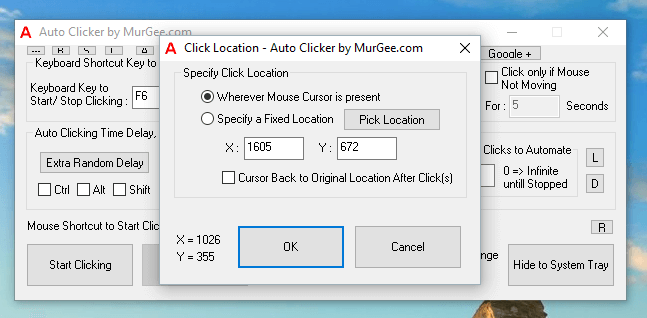
Automated Mouse Clicking Location

Automated Mouse Clicking Location

Note that in order to Click at a Fixed or Specific Screen Location you can use the Pick Location button or manually enter Screen Co-Ordinates. The Current Mouse Cursor location is displayed at the bottom of the Click Location Window as displayed in the screenshot above. You can even instruct the software to click at Fixed Screen Location and automatically bring Mouse Cursor back to it’s original Screen Location.

Mouse & Keyboard Shortcuts to Start Auto Clicking

The Automatic Clicking can be Started with either a Keyboard Shortcut like F6, Ctrl + T, or a Mouse Shortcut like Right Click, Middle Click, etc. Many Games requires you to continuously use Keyboard keys like w, a , s ,d etc and hence this Auto Clicker allows you to use Mouse Click as a shortcut to start Clicking. Yes you can even assign a Keyboard Shortcut to Start Mouse Clicking as displayed in the screenshot below.
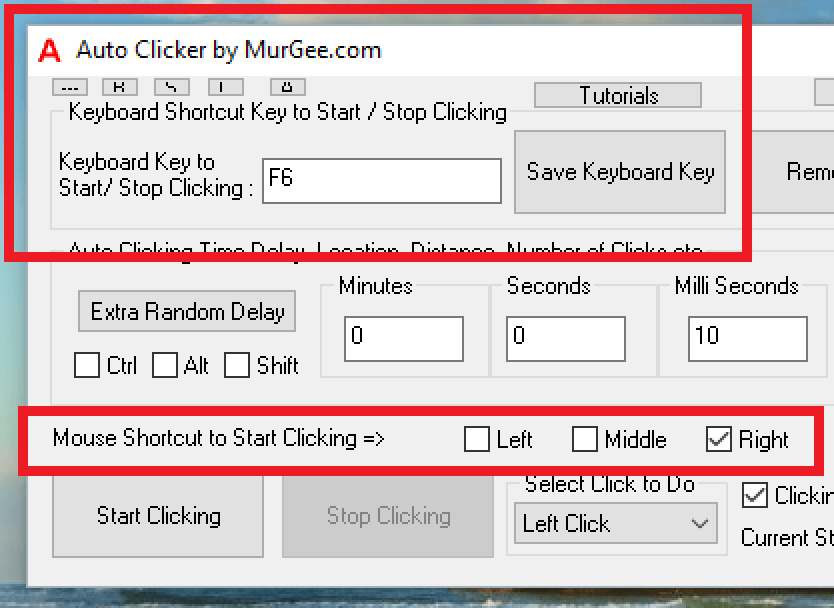
Mouse and Keyboard Shortcut to Start Auto Clicking

Mouse and Keyboard Shortcut to Start Auto Clicking

Apart for the purpose of Starting Automated Mouse Clicking, Keyboard Shortcuts also allows you to Stop Automatic Mouse Clicking. Let’s say you have configured the software to do 1000 Clicks at a time delay of 1 second and have started Mouse Clicking, but in the middle you want to Stop / Abort Mouse Clicking, you can press the Keyboard Shortcut again and the Mouse Clicking will stop. In case of Mouse Shortcuts, by default the Mouse Shortcuts are configured to Start Clicking only, however from the settings, you can enable the Mouse Shortcuts to behave like Keyboard Shortcut and use them for stopping Automatic Mouse Clicking as well.

Single or Multiple Auto Clickers

Having a single Keyboard Shortcut is a quick way to Start and Stop Clicking, however when you need Multiple Keyboard Shortcuts to Start / Stop Clicking at variable speeds or at different screen locations, you can enable Auto Clicker to launch Multiple Times. By default only one instance can be launched, so that whenever you double click on the Desktop Shortcut the existing Auto Clicker is brought forward. In order to launch multiple Auto Clickers, first you need to enable the Multiple Instance option and then onward, you can launch Multiple Auto Clickers.
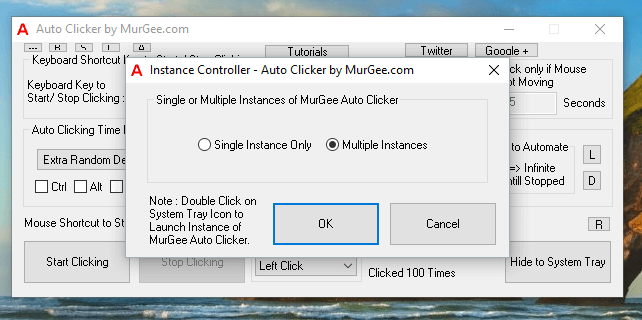
Single or Multiple Auto Clickers

Single or Multiple Auto Clickers

Each Auto Clicker creates an Icon in Notification area allowing you to easily identify the Auto Clicker Instance. The Tool-tip of Notification Icon displays the number of Auto Clicker and associated Keyboard Shortcut and Location of Automated Mouse Clicking as displayed in the screenshot below.
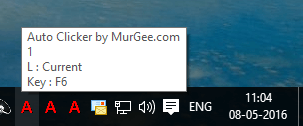
Multiple Auto Clickers in Notification Area

Multiple Auto Clickers in Notification Area

You can Right Click on any of the Notification Area Icon and to control that particular instance of Auto Clicker. The Notification Area icon of Auto Clicker displays a .ico file which you can change to make the identification of Auto Clicker Instance distinct or unique. Whenever the Automated Mouse Clicking is done by the Software a different Icon is displayed so as to identify as to which instance of Auto Clicker is actually doing the Mouse Clicking.

Configure Notification Area Icons of Auto Clicker

Configure Notification Area Icons of Auto Clicker

Note that in the above Screenshot you can either select an existing .ico file to be displayed in the Notification Area or use the default Icon of Auto Clicker. You can even Download more icons from the link provided and use them as Display and Notification Icon for the Auto Clicker.

Visual & Audible Alert for Auto Clicker

When using Auto Clicker to do Automatic Mouse Clicking, there are multiple ways in which the Software provides visual and audible clues to inform you that the Automated Mouse Clicks are being done. The Notification Area Icon change is just one of the Visual Alerts provided by Auto Clicker as described in the paragraph above. When Automated Mouse Clicking is being done, the Mouse Cursor Changes to Clicking Cursor which is basically a red colored Mouse Cursor. The Mouse Cursors are basically .cur or .ani files which bundles Mouse Cursors. You can change the Clicking Cursor of Auto Clicker from the System Menu as displayed in the Screenshot below.
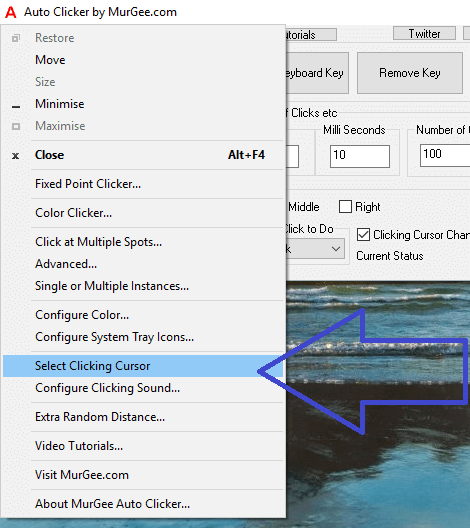
Select Clicking Cursor in Auto Clicker

Select Clicking Cursor in Auto Clicker

The Clicking Cursor is really a distinctive Visual Indication to indicate that Automated Mouse Clicking is being done by the Auto Clicker. Apart from Visual Indications, you can even configure Audible Alerts by enabling the playback of a .wav sound file. Use a small .wav file so that you can hear sound of every Mouse Click as it is being done at configured time interval.
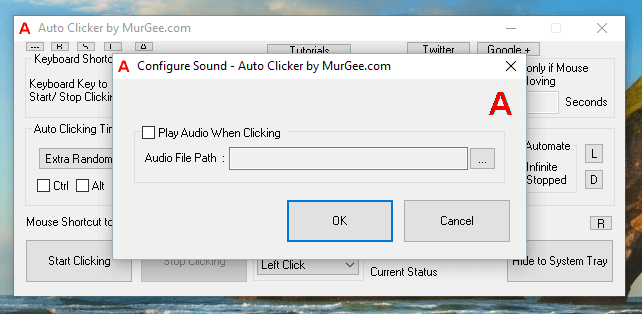
Audible Sound for Automatic Mouse Clicking

Audible Sound for Automatic Mouse Clicking

The Audible / Visual Alerts for Automatic Mouse Clicks can also be useful to distinguish between Multiple Instances of Auto Clicker. As Games have lots of sound effects, make sure to select an audio file which you can distinguish between sounds of Game and of Auto Clicker.

Auto Click at Fixed Screen Locations

When you want to Click at Multiple Fixed Screen Locations, you can either enable the Multiple Instance option in Auto Clicker or use Fixed Point Clicker. On one hand the Auto Clicker allows you to click multiple times with a single keyboard shortcut and on the other hand, the Fixed Point Clicker allows you to assign individual Keyboard Shortcut to Click 1 time at Fixed Screen Location.
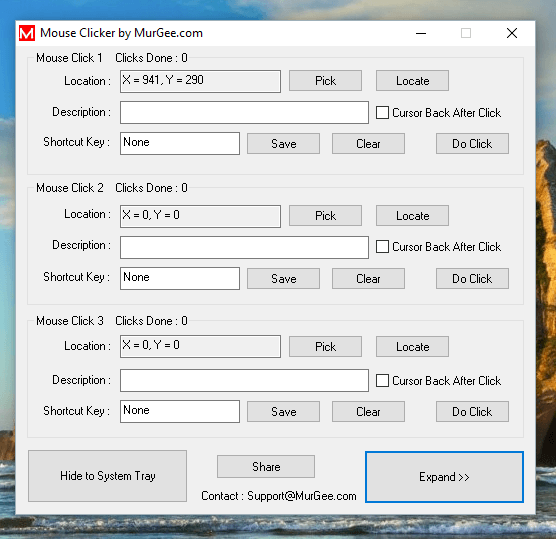
Auto Click at Multiple Fixed Screen Locations

Auto Click at Multiple Fixed Screen Locations

Lots of Online Games like Online Golf, Cookie Clicker etc requires you to Click at pre-defined Screen Location in order to switch between Game Modes or Switch between various Tools. Keyboard Shortcuts are always handy whether you are Playing a Game, using a Text Editor or any other Application, Keyboard Shortcuts are always quick and easy to use tools. Now with Fixed Point Clicker you can create your own Keyboard Shortcuts to do Mouse Clicking at pre-defined Screen Locations easily.

Multiple Auto Clickers with Single Keyboard Shortcut

When you want to control Multiple Auto Clickers with a Single Keyboard Shortcut for clicking at Multiple Screen Locations, using Multiple Instances of Auto Clicker can be little bit difficult. Now with a inbuilt feature, you can use easily create a Keyboard Shortcut to control Multiple Auto Clickers. All you need to do is create Multiple Mouse Clickers, select them and assign a single Keyboard Shortcut to them as displayed in the screenshot below.
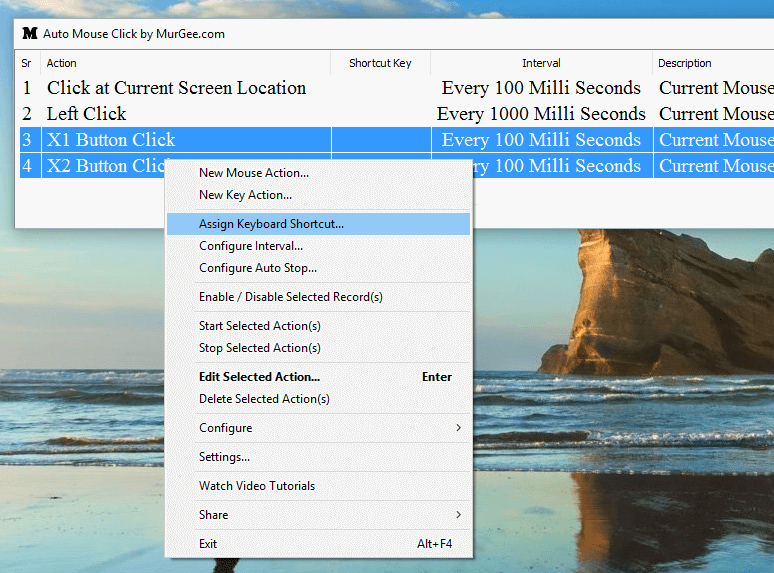
Multiple Auto Clickers with Single Keyboard Shortcut

Multiple Auto Clickers with Single Keyboard Shortcut

Most of the functionality is bundled in the right click menu of this Application. In order to get started Right Click on the Auto Clicker and Click on the Menu Option Click at Multiple Spots as displayed in the screenshot below. This Action launches an inbuilt Application which allows you to create Multiple Auto Clickers which are controllable with Single or Multiple Keyboard Shortcuts.
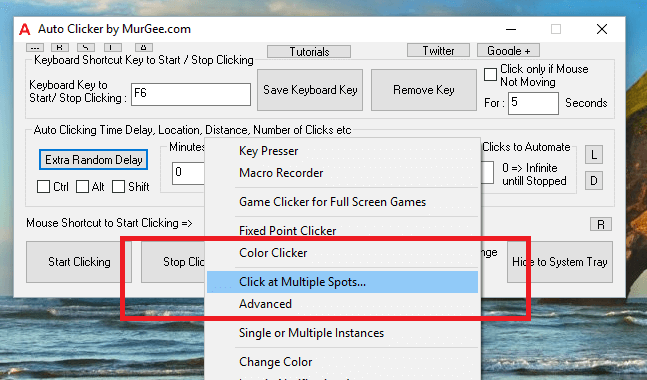
Click at Multiple Spots in Auto Clicker

Click at Multiple Spots in Auto Clicker

Once you have the Click at Multiple Spots Application running, right click on the Software and Click on New Mouse Action. The Mouse Action Screen allows you to define parameters of the Mouse Clicker being created and allows you to define the Screen Location at which this new Clicker should click.
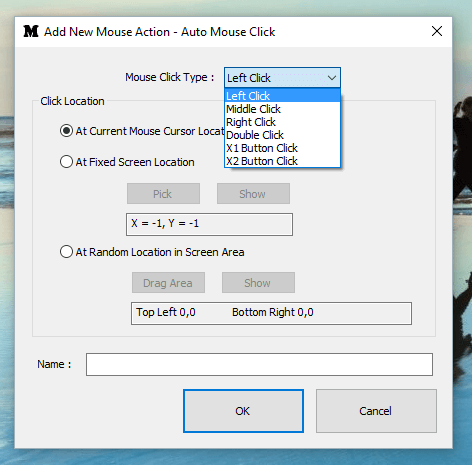
Add Mouse Action to Auto Clicker

Add Mouse Action to Auto Clicker

Note that you can select either Left Click, Middle Click, Right Click, Double Click or even X1 Button Click or X2 Button Click to be Automated by this Mouse Clicking Application. Once you have selected the type of Mouse Click to be simulated, you need to define the Click Location which can be any of the given below.

  1. Click at Current Mouse Cursor Location
  2. Click at Fixed Screen Location
  3. Click in a Random Area identified by a Rectangular Area on Screen

Once you have defined the above mentioned parameters you can assign a Name to this new Mouse Clicker. You can repeat the process above to create more Mouse Clickers. Once you have created the Mouse Clickers in the Application, select a single Mouse Clicker or Multiple Mouse Clickers and assign a Keyboard Shortcut to start those Mouse Clickers. You can Right Click on the Software to Open Settings and configure default parameters. Settings of this Mouse Clicker also allows you to configure a Keyboard Shortcut to Abort all Mouse Clicking done by the software.
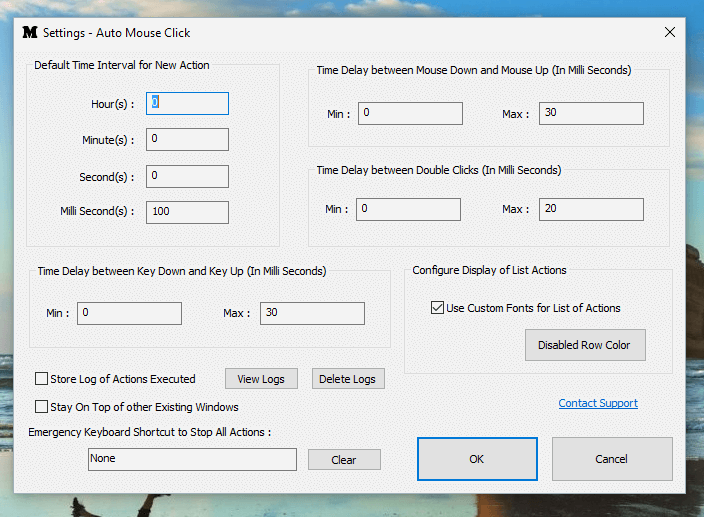
Configure Default Time Duration and other Parameters for Mouse Clickers

Configure Default Time Duration and other Parameters for Mouse Clickers

Apart from Mouse Clickers, you can even create Key Pressers using the same method as described above. Lots of Games and other Applications requires Repetitive Mouse Clicking and pressing of Keystrokes. You can even create Key Pressers the same way and control Multiple Key Pressers with a single Keyboard Shortcut.

Key Presser in Auto Clicker

In built Key Presser in Auto Clicker allows you to press a single Keystroke Multiple Times at configurable Speed. In order to launch the Key Presser, right click on the main screen of the Auto Clicker and Click on Key Presser Menu as displayed in the screenshot below.
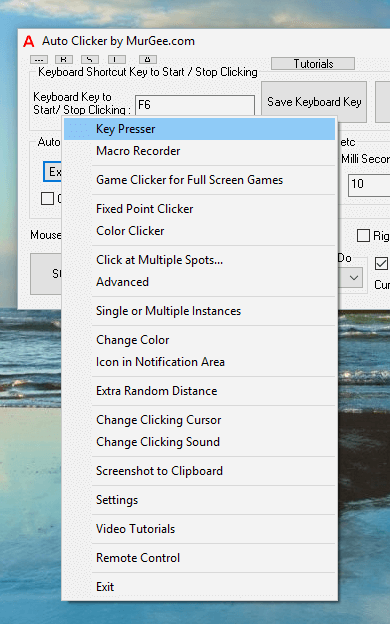
Key Presser in Auto Clicker

Key Presser in Auto Clicker

The Key Presser has Time Delay and other parameters to control pressing of Keystrokes with a Keyboard Shortcut. A drop down allows you to select the Keystroke to be typed onto Active Application and time delay parameters allow you to control the speed of key Presser. You can even specify Random Time Delay so that pressing of Keys is done at a Random and Controllable Speed.
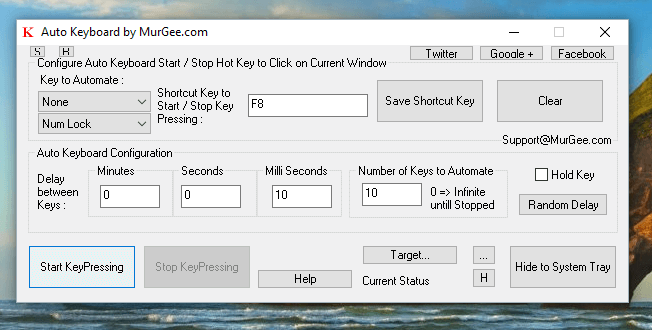
Auto Key Presser

Auto Key Presser

Note that this Auto Key Presser in built right into Auto Clicker and you do not need to download it separately. You can even configure the Key Presser to send keystrokes to a specific Window instead of Active Application Window. Yes you can even launch Multiple Instance of this Auto Key Presser. Note that the Automated Key Pressing done by this key Presser is as good as done manually using Keyboard and by default the Keystrokes are sent to Active Application Window.

Advanced version of Auto Clicker

With Advanced version of Auto Clicker, you can do much more than simple Automated Mouse Clicking. In this Software you get more control over Automated Mouse Clicking as compared to provided by the main screen of Auto Clicker. The given below screenshot displays how you can launch Advanced Auto Clicker from the Right Click Menu of Auto Clicker. The Mouse Clicks and other parameters of Advanced Auto Clicker can be saved in separate Data Files (called as Profiles) and can be loaded as and when required.
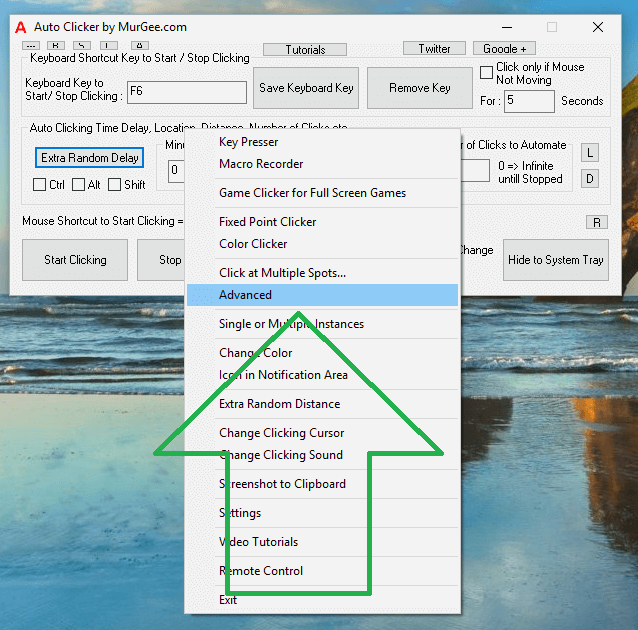
Launch Advanced Auto Clicker

Launch Advanced Auto Clicker

Once you have launched the Advanced Version , right Click on the Software to view the various features offered by the software. The Right Click menu provides you way to Add Mouse Click(s), Schedule / Abort Mouse Clicking, Save / Load Mouse Click Profile and much more as displayed in the screenshot below.
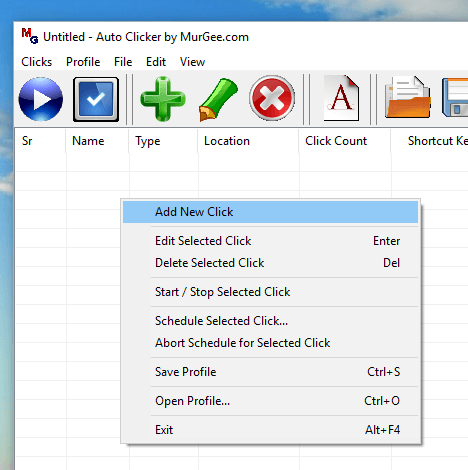
Right Click Menu in Advanced Version of Auto Clicker

Right Click Menu in Advanced Version of Auto Clicker

Buttons and Menu provided at the Top of the Software is a quick alternative to Right Click menu for exploring the Advanced features of this Mouse Automation Software. Adding / Editing of Mouse Clickers is easy and straight forward. Configurable Mouse Click Type, Speed of Mouse Clicking, Number of Automated Mouse Clicks, Keyboard Shortcut all together makes this Software really easy to understand and use.
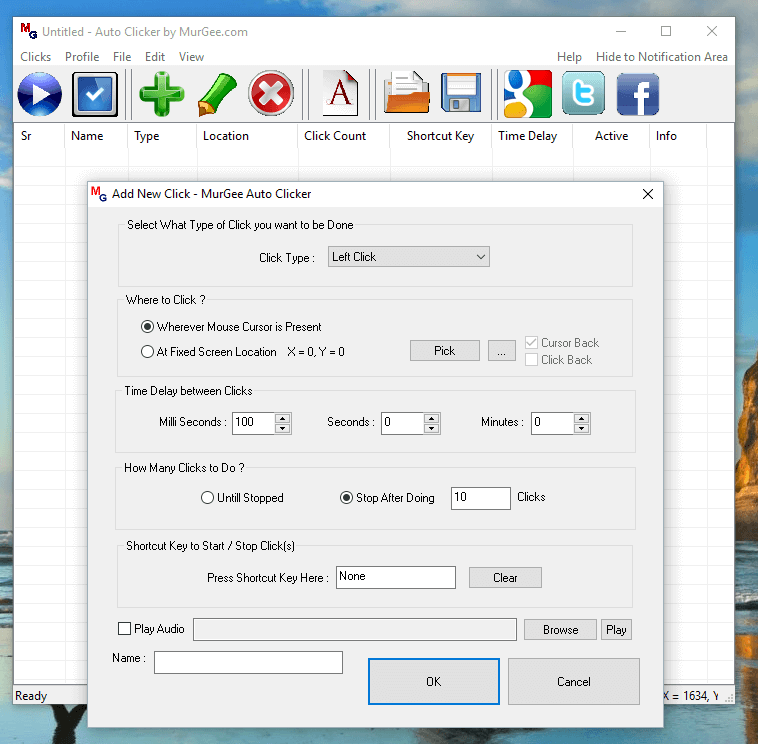
Add Mouse Click to Mouse Clicking Software

Add Mouse Click to Mouse Clicking Software

Once you have added Mouse Click(s) to the Application, you can save it as a Profile so that you do not need to create them again. In order to open the saved Mouse Click Profile file, you can double click on the file and this Advanced version of Auto Clicker will load the saved Mouse Clicks automatically.
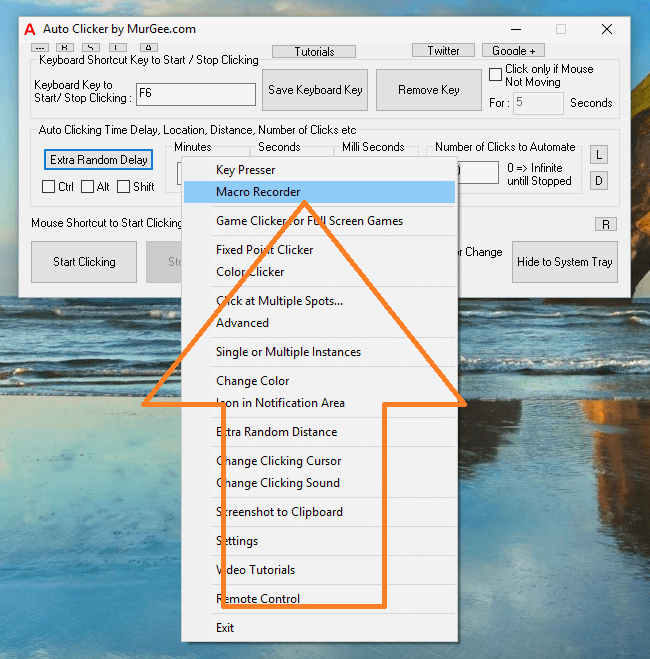
Launch Macro Recorder from Auto Clicker

Launch Macro Recorder from Auto Clicker

Until now we have explored Mouse Clicking and Key Pressing features of Auto Clicker. We have also explored ways to create Keyboard and Mouse Shortcuts to control the Automated Mouse Clicking. The Auto Clicker has been designed by taking into consideration feedback from Gamers and expert Software Developers have worked hard to implement Mouse Clicking capabilities so that every type of Mouse Clicking can be Automated.

Whether Automation of Mouse Clicking is required during a Online Game, Multiplayer Game or any Windows Application which require Fast / Repetitive Mouse Clicking. The Last section of this post will explore how you can use the Macro Recorder to Record and Playback Mouse Clicking and Key Pressing. This can be handy when none of features described above can Automate Combination of Mouse and Keystroke input to your Windows Computer.

Mouse & Keyboard Macro Recorder

Use Macro Recorder of Auto Clicker to record Mouse Clicks and Keystrokes and then play them back to Automate a Repetitive Task. When Recording Mouse Actions, this Macro Recorder Records all Mouse Actions including Mouse Movement, Pressing of Mouse Button, Releasing of Mouse Button and everything you do with all your Mouse Buttons. When Recording of Keystroke is enabled along with recording of Mouse Actions, you can Record keystrokes and Mouse Actions like Ctrl + Click, Shift + Click, etc.
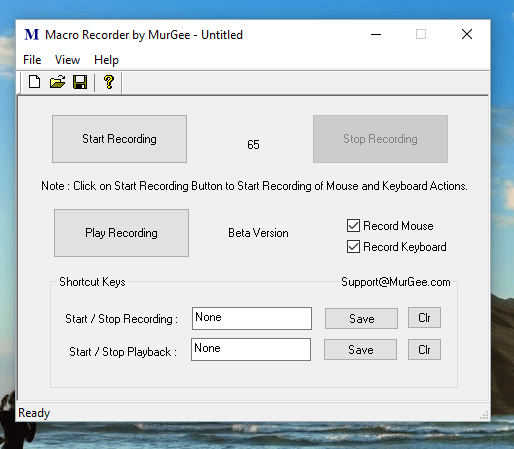
Macro Recorder to Record and Playback Mouse and Keyboard

Macro Recorder to Record and Playback Mouse and Keyboard

In the above Screenshot of Macro Recorder, Recording of Mouse and keyboard is enabled. Note that you can assign Keyboard Shortcuts to Start / Stop Recording and also to Start / Stop Playback of Recorded Macro. Playback of Mouse and Keystroke Actions is done at the same speed as during Recording of Macro.

Download Auto Clicker

All the features explained above are built right into the Auto Clicker making it really the best Mouse Automation Utility. Addition of Key Presser and Macro Recorder in the software allows you to Automate Keystrokes along with Mouse Clicking. Within Windows 10 Compatibility, the Auto Clicker works well on Windows 10 and other older version of Microsoft Windows including Windows 8.1, Windows 7, Windows Vista, Windows 2000 and Windows 8.

Auto Clicker

Auto Clicker

Download the Free trial of Auto Clicker and get access to all the features as mentioned above. Gaming with Auto Clicker is more fun and easy to control. Give your fingers a rest and let your computer’s processing power assist you in Gaming and other Repetitive Mouse Clicking with Auto Clicker.

Auto Clicker for MMORPG Games

Auto Keybot & Mousebot

A Windows Software Utility that can work as AutoKeyBot and simultaneously as Auto MouseBot. This Auto Bot can work 24 hours a day and 365 days an year with precision and accuracy. Download this Bot Software or read below to understand how this simple bot application can be handy for you whether you are playing game or working with a complex desktop application or website. The Key and Mouse bot presented here can send single or multiple keystrokes and / or single / multiple mouse clicks of every type.

Keybot and Mousebot together in a single windows software utility

Keybot and Mousebot together in a single windows software utility

Yes the bot displayed in the screenshot above brings you Auto Keybot and Mousebot together in a single cheap and free to try software download. There is much more in the software presenetd above apart from botting up Keyboard keys and mouse clicks, dragging , mouse movement, etc. Accuracy and productivity are one of the two most important factors due to which you can consider the auto mousebot and keybot preseneted here. Let’s say you are playing a game like runescape, farmville, famtown or even any type of action game and you frequently encounter occasions where you need to do mouse clicks in predetermined locations and even predetermined number of times, think of it would’nt it be best if a mousebot could help you automate all the mouse clicks and it could save you time and ofcourse the bot would perform with accuracy and hence your actions would be more productive and saving you time as well. Let’s consider another scenario where you are playing an online of desktop game or interacting with some desktop or web application which requires multiple mouse click to be performed by you an in between you are required to type some text using keyboard or even interact with windows in some other manner, the application presented above with integrated mousebot and keybot along with other assistive functions can make your complex task to as easy as pressing a single key on keyboard.

The Activation fee is required to be paid once you are fully satisfied with the free trial download. Yes this comprehensive windows automation application is inexpensive, professional application which anybody can learn really quickly, is free to download and try, works with Windows 8, Windows 7, Windows Vista, Windows XP, Windows 2000 and as applicable on 32 and 64 bit versions of Windows. The Auto Keybot and Mousebot features displayed in the bot software above depict what all this bot utility has in offer for you on a high level. In case you do wannns give it a try without paying in a single penny, download the software for free and within few minutes you should be able to automate almost any kind of repetitive action comprising of key presses, mouse clicks, etc. This software helps you to save Keybot actions, Mousebot actions and other actions in a .mcs file which when launched executes all the stored mousebot, keybot and other windows actions. Starting the windows automation with .mcs file is as easy as to open a .txt file. Configurable shortcut keys allow you to start / stop the keybot and mousebot actions, there are small examples within the software to give you practical demonstration of keybot and mousebot actions being executed by the .mcs script file.

Read more about this comprehensive software bot or just download and start right away. Yes the bot presented here does have limitations for full screen direct x games and other applications. In full screen direct x games, the mouse, keyboard and other input devices connected to windows work in a different manner. The bot presented here can work good for simulating keyboard actions, automating of mouse clicks, drag / drop etc, however in full screen direct-x games, this software might not work as expected and this is due to differences in direct-x and normal windows mode. The bot presented here can be the easiest bot to learn powering up auto keybot actions, simulating auto keybot actions including all types of keystrokes simulation like function keys, return key, etc. This bot has sample scripts working on auto keybot actions, other examples which demonstrate mouse clicking, mouse movement without clicking, automating launching of websites, applications, etc with a simple and easy to follow interface.

Auto Mouse Clicker for Mac with Middle Mouse Click

Automate Mouse Clicking at current Mouse Location with Middle Mouse Click. The Auto Clicker presented here works on Intel based Mac Systems and this version of Auto Clicker works with Mac Version 10.4 onwards. Have a look at the screenshot below which displays the main screen of the Mac Auto Clicker. The Auto Clicking Utility presented here provides multiple Start / Stop options. Use any of the options provided by the software to Start and Stop Automatic Mouse Clicking. You can even configure the number of clicks to automate after which the Auto Clicker stops clicking automatically.

Auto Clicker for Mac 10.4 Onwards

Auto Click Mouse Left or Right Button with Middle Mouse Button

Download this Auto Clicker for Mac and let the software automatically click left or right mouse button. The Clicking is done at current mouse cursor position and can be started by either pressing the Start Button or configuring the Physical Middle Mouse Click to Start the automatic clicking as configured. Maximum number of mouse clicks to be automated can be configured from the main screen and delay between consecutive mouse clicks can be configured as well by defining the delay in either Seconds or MilliSeconds. Lower the delay between consecutive mouse clicks, the faster the Auto Clicker will do the Mouse Clicking at current mouse cursor position.

Whether you are using Mac Tiger, Leopard, Snow Leopard, Lion or even Mountain Lion, this Auto Clicker will work fine on all the Mac Operating Systems. There are tiny help buttons in the main screen of this Mac Auto Clicker which provide you the related information about a specific functionality. This Mac Auto Clicker is really simple and easy to use. All you would need to do is download the software, run it, specify the clicking control parameters, minimize it or let the software automatically minimize itself and do the mouse clicking wherever Mouse Cursor is present. This Auto Clicker for Mac can be really useful when you need to do numerous mouse clicks and with speed, whether you are playing a game or using any other software, this Auto Clicker for Mac can be really useful to simulate mouse clicks.

Controlled Random delay between mouse clicks will be added in next version of Auto Clicker for Mac. All users get free upgrades to the application and can even suggest new features to this Mac Auto Clicker to get extra functionality added. Download Auto Clicker for Mac and try it for free. In order to download the software, right click on the download link above and save it to your Desktop. Once you have downloaded the Auto Clicker, double click on the downloaded .zip file to view and launch the Auto Clicker for Mac. Just like Finder in Mac, this Auto Clicker also has a Menu which has related commands to this Auto Clicker for Mac. Do write to support@jholu.com to report any bugs, suggest new features, get information about software licence or just send a video about how you are using this Auto Clicker on your Mac. You can find more sophisticated Mouse & Keyboard Automation Software Utilities for Windows on this website. Whether you need Mouse or Keyboard Automation for Mac or for Windows, here you can find appropriate software utility and get your task automated in a really easy way.


Auto Clicker for Mac

Auto Clicker to simulate mouse clicks on a Mac operating System or any other operating system that supports java. This auto clicker is really easy to use and configure. Yes this software utility works on Windows 8, Windows 7, Vista and other Windows versions as well provided Java Runtime version 1.3.1 is installed. This Software utility can be used to simulate or automate multiple mouse clicks with configurable delay in between clicks. In case you would like your mouse cursor to click really fast then just configure the delay in clicks to as low as possible and in case you want the automatic mouse clicks with long pauses in between, you can configure the delay in clicks to be on a higher side.

Automate Mouse Clicks on Mac with Auto Clicker

Mouse Clicker Configuration Screen

Download and try out this Auto Clicker for Mac and try it out for free. The software is built using Java and requires your operating system to have minimum 1.3.1 version of Java installed. Whether you want to use this auto clicker on Windows, Mac, Linux or any other computer operating system which has Java support, this free to try auto clicker can be used really easily. The software is bundled as a .zip file which on extraction will extract few files. Download the zip file, extract it and have a look at the ReadMe.txt file which explains how to use this Auto Clicker on Mac. In case you need an Auto Clicker for Windows, this will work equally good, however you can get Auto Clicker for Windows which provides lots of more functionalities as compared to this version of Auto Clicker.

In order to use this Auto Clicker for Mac, you would need to download the zip file and extract it. The zip file contains AutoClicker.jar and AutoClickerSettings.jar which are the files you would need to use in order to automate the mouse clicking and configure settings respectively. This Auto Clicker will work fine on your Mac provided you do have java version greater than or equal to 1.1.3. In order to check the java version on your Mac, you can open up the Hard Drive Icon, Click on the Hard Drive Icon on Mac, navigate to Applications and look for Utilities. Once you have located the Utilities option , find and click on the Terminal menu option. Once you have the Terminal window open, run the command java -version and you should be able to see which version of Java does your Mac has. Leopard or Mac OS X 10.5, Snow Leopard or Mac OS X 10.6, Lion or Mac OS X 10.7, Mountain Lion or Mac OS X 10.8 versions of Mac should be able to run this Auto Clicker fine.

In order to use this Auto Clicker for Mac, you would need to download, extract and copy the files onto your Mac and then you would need to configure a Keyboard Shortcut to launch the file AutoClicker.jar. This AutoClicker file when launched starts clicking wherever the mouse cursor is present. The file when launched again, stops the mouse clicking. Once you have configured a keyboard shortcut to the AutoClicker file, you should be able to easily start and stop the automatic mouse clicking with the same keyboard shortcut. On a Leopard or Mac OS X 10.5 version, you can add a keyboard shortcut to launch an application using Keyboard Shortcuts in Apple Menu – > System Preferences – > Keyboard & Mouse.

Timed Clicker to automate mouse clicks at specified time

Automate Clicking of Mouse Cursor in a timed manner with Timed Clicker. The Mouse Automation Software downloads presented here can click mouse as and when required. Whether you need to simulate a timed single mouse click or multiple mouse clicks in a timed manner, you will find an appropriate mouse automation software utility. The Mouse Automation Software downloads come with integrated help video tutorials describing how to use the downloaded software utility automating mouse and even keyboard.

Timed Clicker to Time Mouse Clicks

Create a Script, Schedule it to run at a defined Time

Apart from simulating timed mouse clicks you can even perform timed mouse movements without any type of actual clicks. The Timed Clicker allows to schedule mouse clicks as required. You can define when to start the mouse clicking , when to stop the clicking of mouse and at what frequency and location you want the mouse clicks to be performed. When the Timed Clicker is active, it displays an icon in system tray so that you do know that the software is working. You can even configure it so that it should exit automatically when all the scheduled actions have been performed. Auto Exit feature frees up memory used by the software utility and saves some CPU cycles as well.

Clicking on Windows Screen is co-ordinate specific and the Auto Mouse Clicker Software allows you to take full control over your automation requirements. You can add a window action which will move the selected window to a specific location at the start of the automation, making sure that the timed mouse clicks will be performed where you expect them. As with all the software applications, you must test your timed mouse clicks so that even when you are away, the software do performs the tasks it is supposed to do. Whether you want to perform a single mouse click, multiple mouse clicks or any other window action, you will find almost everything in this free to try or shareware application. The Help page of the Software has a video tutorial about timing the mouse clicks which can be really useful. There are many other video tutorial which can simplify using the software to perform timed clicks, automated clicks, multiple clicks grouping together single and double left and right clicks and yes even dragging of mouse cursor can be automated and performed in a timed manner .

Auto Right Click with Mouse Clicker

Automate Right Clicking of Mouse Cursor easily and quickly with the software presented here. Download the software and automatically click the selected click type when the configured short-cut key combination is pressed on keyboard.

Download the Mouse Clicking , Install it and Run it. By default the software is configured to simulate left mouse clicks. When you want to simulate right mouse clicks, click on the radio button at the bottom of the software screen, define other parameters of the mouse clicker.

Auto Right Click with Auto Right Clicker

Use the Mouse Clicker to Auto Right Click

When you are done specifying the parameters in the Mouse Clicker software click on Hide to System Tray. Now Move the mouse cursor on the screen, wherever you want to auto right click and press the configured shortcut key to start auto right clicking on your computer screen.

The Software allows to auto left click, auto right click and even double clicks. The time between the clicks can be controlled as well using this Mouse Clicker. The Delay between two consecutive right clicks can be specified as Fixed Delay or Random Delay between clicks. The Screen Location Picker allows to pickup screen location and provides 3 different options. The first option is to automate left or right click wherever the mouse cursor is present at the time of starting the auto clicking. The second option allows to simulate left or right mouse button click at random location onto the screen. The third screen picking up location allows to confine the mouse clicking into a configurable rectangular area.

Other section of the software allows to control how many left or right single or double mouse clicks you want to simulate when the configured shortcut key combination is pressed onto the keyboard. Click Type Selection allows to select what type of click you want to simulate, just select the appropriate click type from the available options and your click settings will be saved automatically. Finally Status Bar of the Software displays current status of the Mouse Clicker and the Hide to System Tray Button allows to hide the main window of this Mouse Clicker so that you can utilize your full screen without this Mouse Clicker obstructing your view.

Close Popup Window Automatically on Windows Computer

The Software presented here can be used as quick and easy window closer to close any unwanted popup reminders or other message box displays. The Software presented here is available for download now and can be used for multiple uses. It can be simply used as Window Closer to close any specified window. As the screenshot below displays, all you need to do is just select the desired window and mark it for automatic closure. The Button Clicker is a Window Automation Software and can be used on Windows 8, Windows 7, Vista, XP and even on Windows 2000.

Close Popup Windows automatically with Window Closer

Mark Selected Window for Closure by defining Window Action

Download configurable Window Closer to close any popup window automatically. Try out the software for free on your windows 8, windows 7, vista, xp or other version of windows. Just bring up the desired window on screen, locate it in the Button Clicker and mark it to Auto Close. The Software presented here can be used for many other purposes such as Automatic Window Title Changer, etc. You can even use the software to click on the minimize and maximize button of any selected window.

Closing selected Window automatically was never so easy and configurable to manage. In case you would like to automate your application windows or document window in any other way for testing or some other automation purposes, please do write to the support team and you can get your desired window automation feature added for you easily. Get rid of unwanted application windows easily and quickly with this configurable Window Closer.

Disable Keyboard and Mouse on a Windows Computer

This post presents a software utility which can be used to disable keyboard and / or mouse on a computer running almost any version of Windows. The Software Application does not requires you to look into registry, you do not need to restart your computer in order to enable the disabled keyboard or mouse and there is totally no need to struggle with control panel options and struggle with corresponding driver installation details or anything else.

The Keyboard & Mouse Disabler is really easy to use and can disable almost all keyboard keys. The Disabling of Mouse comes with various options. The Mouse Disabler provides indivual control to disable left click, right click, mouse wheel, middle button and even mouse movements. Effectively you can just select t disable the mouse clicks and still allow mouse movements on your windows desktop or laptop computer. Once you disable the Mouse using the Mouse Disabler, the touchpad of a laptop will also get disabled and all the options checked in the Mouse Disabler will be effective for the laptop’s touchpad as well.

Disable Complete Keyboard and Mouse Functions with Mouse Disabler

Select applicable checkBox to disable Keyboard or separate Mouse Functions

Download and try out this Mouse Disabler Software Utility and get complete control over keyboard and mouse. With Mouse Disabler, you will be able to Disable Mouse and whenever you want it again to be enabled, just close the software utility or press on the reset button on the main screen of the software utility. In order to navigate to various controls of the software utility, you will be able to use Tab key on keyboard (provided you have not disabled the keyboard using this software utility). The Mouse Disabler can be minimized as well and various shortcut keys are available in the software, which can be seen when you press the Alt Key on Keyboard. In order to disable the keyboard, all you need to do is check the checkbox that says Disable Keyboard Keys, that’s it. Whenever you want your keyboard to be enabled again, just close the software utility using the top cross button on the main screen of this software utility.

Yes this way of disabling the keyboard and mouse works on Windows 8, Windows 7, XP, Vista and probably on other Windows versions. Disable Keyboard or Mouse with simple software application. When you disable keyboard using this software, the key Ctrl+Alt+Del will not be disabled and some other special windows keys will not be disabled. The software remembers whether you have disabled the keyboard or mouse and next time you launch the software, the corresponding mouse functionality will be disabled and same applies for disabling of keyboard. The Reset Settings button at the bottom right corner of the screen will uncheck all the options to disable keyboard and mouse and will fully enable, the blocked functionalities of mouse or keyboard.

Automatic Window Title Changer

Now you can change Window Title of any selected Window by just specifying new title. The Button Clicker Software can be used for many things like closing an application window, maximizing the window, minimizing the specified window automatically, moving specified window to the monitor on which mouse cursor is present and much more. The Automatic Changing of Window Title can equally be easily accomplished by following few simple steps. Once you have specified the new text / title of the window, the Button Clicker will automatically change the title of the selected window every time it is launched.

Software to Change Window Title Automatically

Change Window Title Automatically

As displayed in the figure above Window Title of any selected window can be changed really easily. The Software Application can be minimized or hidden in the System Tray as an icon & it monitors all the application windows launched. Whenever a Window with configured Window Text and Window Class appears, the software application can initiate changes to that application. Using the Software as Automatic Window Title Changer can be done in only a few steps. The Main Window of the Software presented here is divided into two parts. The upper part displays all the application windows as they gain focus along with date / time. The lower part of the software application allows you to add action associated with the window selected from the top list.

In order to use the application as automatic window title changer, download and install the window automation software utility. Launch the application from the programs menu or from the desktop shortcut. The Main Window of the Window Automation Software is also displayed above along with a sample application in which the title text was changed automatically by the software application presented above. In order to change the title of the window, you would have to launch it so that you can show that window to the Button Clicker software utility. The upper part of the software will display the application’s original title text. Select the desired record from the list and click on the Add Window Action button, this will present you another popup screen and will allow you to specify new text of the selected application window in the comments field.

Once you have specified the new text of any application, you Automatic Window Title Changer is ready for use. You can minimize the Button Clicker Software utility or Hide it to system tray. Now onwards every time you launch the application configured, it will appear with the new title text instead of the old one. Yes you can delete the Window Action specified, whenever you would like the target window to appear with the original text.

Download the Software Utility now and try it for free. The Software works on Windows XP, Windows 2000, Windows 7, Windows Vista, Windows 8 as well. Yes there will be new features added to the software and the upgrades to the application come for free. Apart from automatically changing the title of selected window (matched using original Window Text and Window Class), you can use the software to do many other things to get complete control over the application windows popping up on your desktop or laptop computer.

Disable ScreenSaver on Windows Or Mac

In Order to Disable ScreenSaver, there are many ways available. Many ways require admin rights and the way to disable screensaver presented here does not even requires admin rights. On a Windows Computer, you can disable the screensaver using the control panel and selecting None as the ScreenSaver in the ScreenSaver Properties. There are registry hacks that can be used to disable screensaver as well. In case you computer is a part of network group, disabling ScreenSaver can be done by managing group policy editor.

Software to disable ScreenSaver on a Windows Computer

Install or Run Auto Mouse Mover to disable ScreenSaver on a Windows Computer

Easy, Quick and Fast way to disable ScreenSaver without bothering for technical details can be done using the software presented here. Download Mouse Automation Software presented here and let this mouse automation software keep your windows computer active at all times. Yes, as long as the Software is simulating the Mouse Cursor Movements, the ScreenSaver will remain disabled. In case your citrix remote computer gets locked up automatically and require you to re-enter password, the software presented here will keep your citrix computer alive and active. In case you do not have admin rights to the computer on which you are working, you may not be able to install any software on the computer. The Software download to Disable ScreenSaver presented above does not requires an installation and can be run without having admin rights.

Similar Software for Mac is available for download to disable screensaver on Mac. The Software for Mac presented here requires Java to be installed on the Mac. The Software application for Windows has more number of options configurable options. However the basis principle behind both the software downloads to disable screensaver is the same. Yes, the software to disable screensaver on Mac can be used on a Windows computer as well, however as the Software presented for Windows has more number of configurable options, you may prefer to use the software made specifically for Windows.

The Software downloads presented above for either Windows or for Mac can be used to disable screensaver temporarily or even permanently. You can easily close the application to stop the mouse automation software simulating mouse movements. Enough care has been taken to make sure that the software downloads presented above do not contain any type of virus or malware. All the MurGee Software downloads are scanned using latest available antiviruses and are clean & safe to download & optionally install. The Software Applications presented above do not require installation and can be run directly.

In case you are still wondering how to disable screensaver on a Windows 7, Windows Vista, XP, Windows 2000, Mac or even on a Windows 8 computer, just download & run appropriate software from the links provided in the post. The default options of the software applications presented above will simulate mouse movements and will disable screensaver automatically. In case you would opt to install the software on your windows computer, please navigate to the software details page and download the installer.